Monday, January 27, 2014

Tactical Analysis: PSG 1-1 Guingamp

PSG narrowly avoided a second straight defeat in all competitions at Guingamp after Alex leveled the score at 1-1 with an 87th minute header from a corner. The visitors dominated possession with 74% but couldn't move the ball quickly enough to trouble Guingamp. For their part, Guingamp were incredibly well organized defensively- as they have been all season. They've conceded just 20 league goals. Only PSG, Monaco and Lille have conceded fewer. Their problem has been at the other end of the pitch. Coming into this game they had failed to score in 4 straight Ligue 1 games and only Sochaux and Ajaccio have registered fewer goals this season.

Laurent Blanc was without Thiago Silva (although he travelled), Lavezzi, Jallet and Rabio. He started in his usual 4-3-3 formation but it quickly became a 4-3-1-2 midfield diamond with Pastore playing just off the forward pairing of Cavani and Ibrahimovic. Thiago Motta, Matuidi and Verratti made up the midfield three. Marquinhos filled in for Thiago Silva alonside Alex.

Jocelyn Gourvennec opted for a 4-4-2. Alioui partnered Yatabare up front. Diallo and Mathis played in the center of midfield with Atik on the right wing and Giresse on the left. Dos Santos, Sorbon, Kerbrat and Pereira made up the back four.


PSG Narrow
PSG started the game in their standard 4-3-3 with Pastore on the left and Cavani on the right but quickly made the switch to the diamond 4-3-1-2. The move seemed to make perfect sense. Guingamp defended with two banks of four so were already outnumbered in the middle of midfield 2 vs. 3. Diallo picked up Matuidi and Mathis picked up Verratti. Thiago Motta was generally left free for PSG deeper in midfield. Switching to two up top meant both Guingamp center backs would be occupied marking Cavani and Ibrahimovic while both their center midfielders were occupied marking Matuidi and Verratti. Blanc's thinking then must have been that Guingamp wouldn't have a spare player in the middle to mark Pastore and he would therefore be left free between Guingamp's defensive and midfield lines to link play forward.

Although it was easy to imagine Blanc's thinking in making the change, its application was unsuccessful for two reasons. Firstly, Pastore's movement between the lines was poor and he was poor when he did get on the ball. Secondly, Guingamp did an excellent job keeping their defensive and midfield lines compact and not allowing much space between the lines.

The midfield diamond also meant PSG were extremely narrow. This allowed the Guingamp fullbacks to play incredibly narrow themselves without the threat of any balls being played in behind them in the channels. The two wingers Atik and Giresse were remarkably disciplined in tracking the forward runs of Maxwell and Van Der Wiel from their fullback positions. As a result, PSG had no wide threat whatsoever so all of their attacking moves had to go through a crowded center of the pitch. The narrow positioning of Guingamp's fullbacks meant one could step out deny Pastore (or Cavani or Ibrahimovic dropping in to receive the ball between the lines) the ability to turn and they'd still have three players left at the back to defend Ibrahimovic and Cavani.

The graphic below shows Guingamp's defensive interceptions and tackles. Notice the number of tackles they were able to make in central areas just outside their own 18 yard box as PSG continued to try to attack through the middle.


Guingamp Direct
Offensively there was nothing subtle to Guingamp's approach. In fact it was one of the most direct performances I've seen in any league in recent memory. They looked to hit long balls early into the attacking third toward Yatabare or to get it wide and play diagonal balls into the box from deep areas. The graphic below shows their attacking third passes for the game- the bulk of which were long balls played from their own half. They were always going to be most likely to score from set pieces and took their chance in the 84th when Yatabare dispatched an Alioui. Troublingly for PSG, the last three goals they've conceded have come from set piece situations after they were beaten 2-1 by Montpelier in the Coupe de France with Montpelier's goals coming from set pieces.


Saturday, January 25, 2014

Tactical Analysis: Real Madrid 2-0 Granada

Second half goals from Cristiano Ronaldo and Karim Benzema lifted Real Madrid to a 2-0 home win over Granada and to the top of the La Liga table for at least a day.

It took some time for Carlo Ancelotti's side to get going. Granada organized themselves well defensively and Real Madrid didn't play at a quick enough pace in the opening half to find a breakthrough. Granada offered nothing going forward however and it always felt as though the home side would find a winner.

Both sides played 4-3-3. Ancelotti made no changes to the side that beat Real Betis 5-0 in their last league outing. Angel Di Maria and Luka Modric played in front of Xabi Alonso in the middle of midfield. Gareth Bale and Ronaldo took up their usual spot on the right and left wings respectively with Benzema at striker.


Lucas Alcaraz was missing Fran Rico in midfield due to yellow card accumulation. He was replaced by Mohammed Fatau on the right side of Granda's central midfield triangle (whoscored.com's lineups graphic below incorrectly shows Fatau in the center of Granada's midfield triangle- it was Iturra who played there).


Granada defended in a deep 4-1-4-1 shape. Recio and Fatau picked up Modric and Di Maria in Granada's midfield bank of four. With Real Madrid playing without a #10, Granada's holding midfielder Manuel Iturra didn't have a direct opponent to mark. He was able to sit just in front of the back four and provide defensive support when Bale and Ronaldo tucked inside from the channels or when Modric and Di Maria were able to break past their markers. Iturra was Granada's key defensive player. He had 6 tackles and 3 interceptions in the match, tops among Granada players in both categories. His tackles were in key areas just outside of his side's own penalty box.


With Granada crowding the middle of the pitch, Real Madrid tried to overload the channels in the opening half and get to the end line to cut balls back across the face of goal. Di Maria would drift toward Ronaldo on the left wing while Marcelo would make overlapping runs from his left back position, leaving Granada's right back Allan Nyom outnumbered. However the home side weren't quite able to make anything of balls hit into the box from wider areas. Benzema hit the crossbar from a Di Maria cross on the left channel but was offside. Ronaldo struck a wonderful overhead kick from a Modric cross on the right side of the penalty area but Granada goalkeeper Roberto made a world class reaction save. Despite those two decent chances, Ancelotti's side were unimpressive in the first half. The lack of space they were being afforded in the middle of the pitch was causing frustration. Each time Ronaldo dribbled inside from the left he was met quickly by Iturra before he could find the space to get at the Granada center backs. Twice the Ballon D'or winner dribbled inside only to be met by Iturra and forced into speculative shots that were well off target.

Second Half
Jese replaced Bale at right forward in a like for like halftime substitution. With Di Maria playing in left center midfield, Real Madrid's shape can be quite flexible. Di Maria is a natural wide player and can therefore slot into a position wide on the left, allowing Ronaldo to take a more central position alongside Benzema in a formation akin to 4-4-2. This is what Ancelotti's side did in the second half. Ronaldo provided another target through the middle. His movement in central zones made Real Madrid less rigid and predictable than they'd been in the first half and put La Liga's leading scorer in more dangerous positions in front of goal. The graphic below shows a comparison of Real Madrid's attacking third passes in the first and second half. In the second half they were more successfully able to offer some penetrating passes through the middle in large part because Ronaldo was giving Granada an extra body to worry about in central areas around the box. He would get Real Madrid's opener after receiving a Modric pass in a central area just inside the 18.


After Ronaldo's opener the home side were comfortable. Granada rarely got anywhere near Diego Lopez's goal. A swift 1-2 between Marcelo and Ronaldo set up Benzema for an easy tap in to put the game beyond the doubt.

Luka Modric
Modric's performance was noteworthy. His incisive passing and control in tight areas are remarkable. He completed 92% of his passes and completed 26 passes in the attacking third- level with Ronaldo for most in the game.

Tuesday, January 21, 2014

Tactical Analysis: West Brom 1-1 Everton

Diego Lugano headed in a second half equalizer to give Pepe Mel a 1-1 draw with Everton in his first game as West Brom manager. Lugano was an unlikely hero- he had been largely responsible for Everton's opener after his slow reaction to a Romelu Lukaku flicked header left Kevin Mirallas through on goal to finish with ease.

It was a strange contest with few clear cut scoring opportunities. Everton were a far cry from the energetic, attacking side they've become known for under Roberto Martinez and West Brom didn't have the quality in the attacking third to offer a consistent goal scoring threat.

Martinez went with his usual 4-2-3-1. Ross Barkley remains sidelined with a broken toe and Steven Pienaar missed out with a groin injury so Martinez had to do some shuffling with his three attacking midfielders. Kevin Mirallas played through the middle, Leon Osman played on the left and Brian Oviedo on the right.

Mel opted for a 4-4-2 in his first game in charge. Matej Vydra partnered Nicolas Anelka up front. James Morrison was chosen ahead of Youssuf Mulumbu to partner Claudio Yacob in the middle of midfield. They were flanked by Christ Brunt on the left and Zoltan Gera on the right. Gareth McAuley was unable to recover in time from a hamstring injury and was replaced by Lugano at center back.


Probably the most interesting tactical feature of the first half was West Brom's pressing in midfield. They defended in banks of four. Morrison and Yacob would immediately close down Gareth Barry and James McCarthy when they received the ball in deep positions in midfield. Behind them, Olsson and Lugano would stick tight to the backs of Lukaku and Mirallas and follow them when they tried to drop off into midfield to find space. The midfield pressing limited the amount of time Barry and McCarthy had on the ball and forced them into making backwards and sideways passes. They struggled to play penetrating passes into the front four and as a result the pace of Everton's passing moves was much slower than we're used to seeing.


That Everton's goal came from an uncharacteristically direct move was in part due to West Brom's pressing. Martinez's side had been struggling to transition from the midfield to the attacking third when Sylvain Distin bypassed the midfield altogether and clipped a long ball into Lukaku making a diagonal run. Here, West Brom's tactics hurt them. Because Morrison and Yacob were pressing Barry and McCarthy in midfield, it meant neither were available to pick up the #10 Mirallas in between the lines. As a result, one of the two West Brom center backs had to step out and stick tight to him rather than tucking in and providing cover on Lukaku. The screen shots below show the sequence leading up to the goal. Lugano steps forward to get tight on the back of Mirallas while Olsson marks Lukaku (image 1). Lukaku makes a diagonal run in behind Lugano, forcing Olsson away from his left center back position towards the right channel, leaving an ocean of space through the middle of the pitch (image 2). Lukaku flicks a header on into that space and Mirallas spins off Lugano and beats him in behind for pace. Without a spare center back to provide cover it was an easy finish for Mirallas.

Image 1: Lugano and Olsson tight to Mirallas and Lukaku
Image 2: Olsson forced to track Lukaku's run towards right channel, Mirallas sprints into space left open in behind
West Brom's primary attacking approach in the first half was through the channels. Both Everton fullbacks Seamus Coleman and Leighton Baines are encouraged to provide width high up the pitch when Everton are in possession, thus leaving space in behind them for the opposition to counter into. Anelka would quickly drift wide into this space when West Brom won the ball back and receive outlet passes in the channels. He'd look for Vydra or one of the midfielders breaking forward but too often West Brom's passing was sloppy on the break and they couldn't take advantage of some favorable positions in wide areas.

Mel changes to 4-2-3-1
They key to West Brom getting back in the game was Mel's change in shape to 4-2-3-1 after he introduced Mulumbu for Gera in the 60th minute. Mulumbu played in midfield alongside Yacob, allowing Morrison to move into an advanced #10 position behind Victor Anichebe who had come on at half for Vydra. Anelka moved to the right wing. The shift to three in central midfield allowed West Brom to more comfortably keep possession in attacking areas. Morrison provided the link forward that had been missing when the shape was 4-4-2. West Brom had completed 56 passes in the attacking third in the first hour of play before the change. They completed 45 attacking third passes in the 30 minutes after it, a spell that saw them get an equalizer and close out the contest looking the more likely to find a winner.


Conclusion
The 1-1 result was fair as neither side did enough to win this. Despite looking less than their best Everton were the better side in the first half. West Brom improved in the second half and Mel deserves credit for the impact his switch from 4-4-2 to 4-2-3-1 had on the balance of play.

Sunday, January 19, 2014

United's defensive lapses result in comfortable Chelsea win

With Wayne Rooney and Robin Van Persie sidelined with injuries, it was always going to be important Manchester United limited defensive errors in order to have a shot at getting a result at Chelsea. Moyes would have expected goals to be tough to come by on the road against a team led by Jose Mourinho- a manager who is historically cautious in big games. Going behind would force United to open themselves up to get back in the contest against a Chelsea side comfortable defending for long stretches of time and playing on the counter. That Chelsea's second and third goals were the result of criminally poor defending from corner kicks meant the home side never really had to kick into their highest gear and play particularly well.

Moyes' side started brightly, particularly attacking down the channels. The fullbacks Evra and Rafael overlapped Young and Valencia well forcing Chelsea's wide attackers Hazard and Willian to defend deep in their own half. Januzaj drifted towards the left channel from his starting #10 position to create overloads on Ivanovic. Although United were unable to translate their early pressure into genuinely threatening opportunities, they were at least keeping Chelsea's dangerous attacking midfielders pinned into their own half.


Samuel Eto'o's opener came against the run of play and took a fortunate deflection. It was certainly a blow to the visitors but wasn't reflective of poor play from United. Chelsea asserted a bit more control after taking the lead but United showed attacking endeavor of their own creating a few decent half chances that indicated the contest was far from over. On 28 minutes Evra put a shot just wide of Cech's front post. Moments later Januzaj beat David Luiz to the end line but his cut back just eluded Welbeck lurking in the box. Then in the 38th Januzaj found Welbeck free 8 yards from goal but Azpilicueta did just enough to put him off, the shot rolling tamely into Cech's arms.

The game hinged on United's shockingly poor defending from a 45th minute Chelsea corner. Welbeck dealt with the initial ball in but it fell to Ramires outside the penalty area. United's players stepped forward collectively- as they should- but none actually bothered to check the Chelsea runners. Ramires played an easy ball to an unmarked Gary Cahill on the right edge of the box whose ball across the face of goal was easily poked in by Eto'o. Rafael was in the best position to step towards Cahill but inexplicably drifts into a more central area at the crucial moment.

From there it was game over. Chelsea were able to keep a compact organized shape at the back and attack with their front four, leaving Luiz and Ramires to sit in front of the back four and prevent United from countering. Chelsea under Mourinho have traditionally been excellent at protecting leads. United didn't have the creativity or quality in the attacking third to offer a serious threat. When Chelsea's third came from another display of poor set piece defending, any shred of doubt was lifted as to who the points were going to.

The result will of course increase pressure on Moyes. What he'll find so frustrating is that his thin squad didn't play badly for long stretches. Mistakes meant Chelsea didn't have to work as hard for the points as they probably should have based on the balance of play.

On the other side, Mourinho will be well pleased. He got three goals from a striker and his side were professional and ruthless. This had the hint of a Mourinho game under his first spell in charge at the club and his side are looking increasingly difficult to beat at the right time of the season.

Saturday, January 18, 2014

First half 4-4-2 leaves Liverpool too stretched in midfield

Brendan Rodgers's decision to play a 4-4-2 in Liverpool's 2-2 draw with Aston Villa this afternoon was an interesting one. Rodgers would have been well aware Paul Lambert's Villa nearly always play with three in the middle of midfield so would have known his team would be outmanned in that area.

From the opening whistle Liverpool were stretched in the midfield zone. Jordan Henderson partnered Steven Gerrard at center midfield. The two tried to get forward in possession to offer support in attacking areas. However, when Liverpool lost possession, they were out of position to offer protection for the back four and Villa were able to break uncontested through the middle.

Villa set out in a 4-1-2-1-2 shape with Andy Weimann playing at the top of the diamond just behind the front two of Christian Benteke and Gabriel Agbonlahor. Ashley Westwood sat just in front of the back four with Karim El Ahmadi and Fabian Delph on either side of him as box to box runners. The diamond midfield meant Gerrard and Henderson were often outnumbered 2 v. 4 in the middle of the pitch. When Villa won the ball back they were able to play easy outlet passes into Weimann or Benteke dropping in off the Liverpool center backs. They would then look to play penetrating balls to Agbonlahor running in the channels in the space behind Liverpool's advanced fullbacks. For Villa's opener Benteke provided the outlet pass for Delph and found Agbonlahor racing down the left sideline. Agbonlahor found Weimann in the box with a well weighted ball in for the goal.

Starting XI's: Liverpool 4-4-2; Villa 4-1-2-1-2
Liverpool's 4-4-2 shape also wasn't offering enough going forward. Although Coutinho tried to tuck inside from a starting left position to link play with the two forwards, it was easy for Villa to defend. Delph and El Ahmadi could apply pressure to Gerrard and Henderson while Westwood sat in the space between the lines to check Coutinho's runs inside or Suarez and Sturridge dropping in off the center backs. As a result, Liverpool struggled to get into the same sort of passing high up the pitch they're used to at Anfield.

Rodgers recognized the weakness of having just two center midfielders on and made an important change at halftime by bringing on Lucas. Rather than subbing off one of his center forwards in order to add Lucas as a third midfielder, Rodgers instead took off Coutinho. Lucas sat in front of the back four, providing both protection for the back four when Villa countered and an extra passing option in midfield. Replacing a left sided attacking midfielder with a center midfielder meant Liverpool ran the risk of not having an attacker in advanced areas wide on the left. Their solution for this problem was clever. Aly Cissokho switched from a left fullback to a much more advanced left wing back. With Raheem Sterling providing natural attacking width on the right, Glen Johnson was able to sit deeper alongside Martin Skrtel and Kolo Toure as part of a back three. Liverpool's shape in possession was therefore more or less a slightly titled 3-5-2. Defensively Cissokho would drop back in to form a back four.

Liverpool shape in second half when in possession
The introduction of Lucas allowed Liverpool to assert more control on the game and left them less vulnerable on the counter. The Brazilian was forced off with an injury in the 66th minute and was replaced in a like-for-like sub with Joe Allen. Allen didn't offer quite the same sturdy platform for Gerrard and Henderson to get forward that Lucas did and at times Liverpool looked uncertain at the back. The game surprisingly fizzled out a bit after Gerrard equalized from the penalty spot. Villa deserve credit for not allowing the home side to take control of the contest after that goal.

Tactical Analysis: Sunderland 2-2 Southampton

Sunderland clawed their way back to earn a 2-2 draw after falling two goals behind in a first half dominated by the visiting Saints. Mauricio Pochettino's side controlled the tempo in the opening half with nearly 70% possession and created a slew of decent chances. However, despite being far less fluid than the visitors in the final third, Sunderland fought back in the second half by pressing Southampton further up the pitch and hurrying them in possession.

Pochettino used a sort of fusion 4-3-3/4-2-3-1 with Steven Davis playing deeper and more narrow than a typical right sided attacking midfielder. Adam Lallana was in the #10 spot behind Rickie Lambert. Victor Wanyama was unable to recover from a calf injury in time so Jack Cork was given the nod alongside Morgan Schneiderlin in midfield.

Gus Poyet opted for his standard 4-3-3. Lee Cattermole sat in front of the back four with Seb Larsson and Ki on either side of him as midfield shuttlers. Jozy Altidore was given the start at striker ahead of Steven Fletcher.


From the start of the match Sunderland defended in a 4-1-4-1 shape with Cattermole sitting in between the defensive and midfield four tracking the movement of Lallana in between the lines. The key to Southampton's first half possession dominance was the positioning of Steven Davis. Although he was listed as the right sided player in Southampton's attacking midfield three, he actually took up a deep and narrow position alongside Schneiderlin and Cork. This meant that when Ki and Larsson tried to press Cork and Schneiderlin respectively, Southampton always had Davis free in midfield to receive a pass and as a result Southampton were able to keep attacking moves going without being forced into hitting long hopeful balls forward. The graphic below shows where Davis received passes in the first half and all of his first half passes. Noticed he received passes throughout the deep midfield zone as Southampton's spare midfielder, not just on the right side.


Southampton's goals were a result of their possession dominance. Sunderland were pinned in their own half and when they did win the ball back they were too deep to find an outlet ball and maintain a bit of possession of their own. With all three Sunderland midfielders and the two wide forwards forced to defend deep in their own half, the only option was to lump the ball long towards Altidore when they won possession. He was an isolated figure up front and needed to hold the ball up long enough to bring the midfield runners into play. It was always going to be a difficult and thankless task but the American didn't perform it well enough given his size and strength. Too often his first touch and passing accuracy let him down. He completed just 2 of 9 passes in the attacking third in the first half.

For the opener the Black Cats failed to clear their lines in their own penalty area as they defended frantically. The ball fell for Jay Rodriguez at the top of the box and he dispatched his effort brilliantly. Rodriguez probably should have doubled his tally moments later when Lambert played him through but Vitto Mannone saved his effort towards the back post. When the Saints eventually did get their second through an excellently taken Jose Fonte volley off a corner the lead was no more than they deserved.

Pochettino therefore would have been bitterly disappointed to have conceded so quickly after on Sunderland's only sniff of a chance in the first half (they finished the half with just two shots, the goal the only one on target). Johnson did well to spot Borini's diagonal outside to inside run. Calum Chambers appeared to have done well to recover into a good position to get a block on but Borini cut his shot back across goal into the far corner.

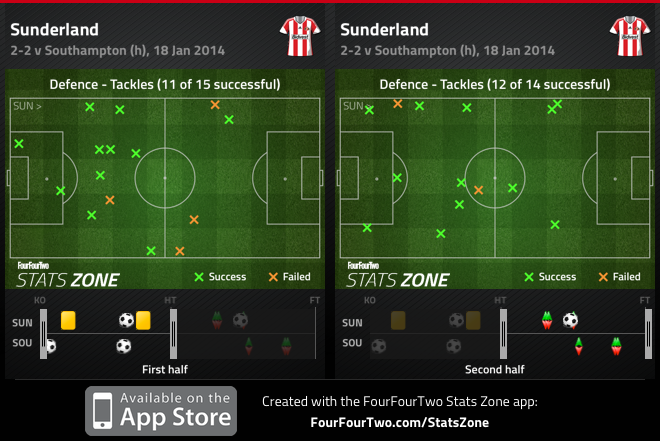
The goal appeared to ignite Poyet's side and the home crowd going into the second half. Although Southampton created dangerous opportunities on the break in the opening 15 minutes of the half, Sunderland offered more of a threat themselves going forward. The key to Sunderland getting back into the contest was their work rate in pressing Southampton in midfield. The visitors didn't enjoy the same time on the ball that they did in the first half and as a result lost possession deeper in midfield. By winning the ball back higher up the pitch, Sunderland had the advantage of both having more players in positions to get forward and Southampton having less time to recover into a decent defensive shape. The additions of Jack Colback and Craig Gardner in the midfield in place of Cattermole and Larsson gave Poyet's side some fresh legs and added energy. The graphics below shows Sunderland winning tackles and interceptions in much more advanced areas in the second half.

Sunderland tackles: first half (left) vs. second half (right)

Sunderland interceptions: first half (left) vs. second half (right)
Johnson's equalizer probably should have been saved by Arthur Boruc but it came at a time when Sunderland were on the ascendency thanks to their pressing.

The contest could roughly be described as one between two very different styles of play. Sunderland's focus was on organization, work rate and quick vertical moves forward while Southampton emphasized possession and patient build up from the back. The visitors were more fluid in attack- their play in the first half was highly impressive- but Poyet's side deserve credit for the commitment they showed after going behind. Whether passion and work rate will be enough to keep them in the Premier League remains to be seen.

Sunday, January 12, 2014

Liverpool beat Stoke in wild contest defined by errors

Liverpool moved back into the top four with a 5-3 win over Stoke in a game that was shockingly sloppy but entertaining. Team tactics played a minor role- the defining feature of the contest was individual errors. Four of the game's goals could be blamed at least partially on individual mistakes- Liverpool's second was the result of errors from Mark Wilson and Ryan Shawcross, Stoke's second came from a poor giveaway by Jordan Henderson, Liverpool's third came from a Wilson giveaway and Stoke's third came after a poor touch from Steven Gerrard gifted Marko Arnautovic possession down the left wing. A fifth goal resulted from an unfortunate Shawcross own goal from an Aly Cissokho shot that was going well wide.

The most obvious tactical features were Stoke's pressing in midfield and their attacks down the channels that culminated in crosses into the box. In the first half Charlie Adam drifted to the right from his #10 role and Stoke looked to overload Cissokho with Adam, Jonathan Walters and Geoff Cameron overlapping from his right back spot. The graphic below shows how heavily Stoke favored attacks down the right in the opening half. The left side of the screen shows Stoke's attacking third passes, the right side shows crosses.


It was interesting then that the home side's opener came from a rare foray down the left when Arnautovic provided a well weighted cross into Peter Crouch from the left wing.

Stoke looked to press Liverpool in midfield quickly closing down Gerrard and Lucas when they got the ball in deep positions. At the beginning of the first half Liverpool seemed to be dealing comfortably with the pressure- they found spaces between the Stoke lines to play balls into Coutinho and Henderson, easily bypassing the Stoke midfield. However, as the half wore on the visitors became increasingly sloppy in possession, a fact Brendan Rodgers will likely be especially frustrated by. At 2-0 up his side had the opportunity to take control of the game and dictate the tempo. Instead they were put off by Stoke's pressing and the match became frantic. Too often Liverpool gave away possession high up the field, allowing Stoke to break forward at an underprotected defense. The graphic below shows Stoke's 17 interceptions, 7 of which occurred in Liverpool's defensive half and the bulk of which occurred in the middle third of the pitch. By comparison Liverpool's interceptions occurred in deeper areas. They had just 2 interceptions in the attacking half, one of which resulted in Sterling winning a penalty.


When in possession Stoke looked to get the ball into the channels and hit crosses into the box towards Crouch. They won 11 corners and played a remarkable 51 crosses.  

Rodgers' side was at its most dangerous on the break, particularly after the introduction of Daniel Sturridge. With Sturridge on, Liverpool had three players in Sturridge, Henderson and Raheem Sterling with the energy and pace to be dangerous on the break. For Liverpool's fourth Sturridge received an outlet pass and was able to break through the middle at pace on the counter before cleverly laying off to Suarez to tuck home. Those two players would ultimately prove the difference makers in the contest as they combined yet again for Liverpool's fifth, this time with Suarez turning provider on the break for Sturridge.

In the end this was a stereotypical English game. It was low on technical quality and poise on the ball, high on energy and commitment. The match tape won't be used by youth coaches as an example of polished, intelligent football but it did make for an entertaining spectacle for those of us that can appreciate a sloppy goalfest every now and then.

Saturday, January 11, 2014

Tactical Analysis: Chelsea 2-0 Hull City

Chelsea managed to overcome a well organized Hull City side with second half strikes from Eden Hazard and Fernando Torres after Steve Bruce's side had frustrated the visiting Blues throughout the first half.

Bruce went with the 3-5-1-1 formation he's opted for most of the season with Ahmed Elmohamady and Maynor Figueroa operating as wing backs. George Boyd played a withdrawn forward role in behind Yannick Sagbo.Tom Huddlestone, David Meyler and Jake Livermore made up the midfield three.


Defensively, Hull's shape was almost a 4-5-1 despite the fact they lined up with three central defenders. Boyd would drop in on the left side of midfield to pick up Cesar Azpilicueta with Figueroa sitting in behind more as a traditional left back. On the other side Elmohamady defended higher up the pitch on Ashley Cole as part of the midfield bank of five. Behind him James Chester would close down the right flank from his right center back spot if any balls got in behind Elmohamady. The graphic below roughly shows Hull's shape.


Coming up against a midfield bank of five and three narrow center backs in behind them, Chelsea found it incredibly difficult to get any sort of penetration through the middle of the pitch. Mourinho played his normal 4-2-3-1 with David Luiz and Ramires as the double pivot and Oscar in the #10 role. Hulls shape was good and there weren't gaps available for Luiz and Ramires to play balls through the Hull midfield into Oscar and Hazard and Willian tucking inside from the wings. As a result, Chelsea were unable to get at the three Hull center backs. The screen shot below shows how compact Hull were and how crowded the center of the pitch was for Chelsea. All 11 Hull players are in the defensive half and the midfield five are working hard to deny Chelsea space in between the lines.


On a few occasions Luiz looked to bypass the Hull midfield with balls over the top into the channels but the three center backs were usually able to deal with them comfortably.

When Chelsea's opener finally arrived it was a result of brilliant build up play from the Blues and an excellent finish from Hazard rather than a loss of defensive shape from City. Ashley Cole got into an advanced narrow position, rare for him under Mourinho, and played a clever flick onto Hazard at the edge of the box. He was able to create enough space for himself to fire low past McGregor into the right corner of the net.

After the goal Hull ultimately shifted to a 4-4-2 but never really troubled Chelsea. With the home side forced to take a more adventurous approach, Chelsea had more opportunities to transition forward quickly on the counter. Torres sealed the win for Chelsea in the 87th from a two pass Chelsea move on the break.

Tuesday, January 7, 2014

Deep line, 2 man midfield leave Spurs too open in defeat to Arsenal

During his spells at both Chelsea and Tottenham, Andre Villas Boas was rather unyielding in his use of a high defensive line despite not having the ideal personnel to suit such a system. In late October 2011, Villas Boas's Chelsea were ripped apart 5-3 by Arsenal as the Gunners were continually able to run onto the ball in space behind Chelsea's high line. Chelsea's center backs that afternoon were Branislav Ivanovic and John Terry, two defenders more comfortable defending deep and dealing with crosses into the box than playing high and making recovery runs when balls are played in behind them.

Early in this season Arsenal again made Villas Boas pay for his stubborn insistence on a high line, this time as Spurs boss, in a 1-0 league win at the Emirates. In that contest Theo Walcott tucked in to a narrow position from the right and continually ran in behind the high line of Jan Vertonghen and Michael Dawson. The high line was once again at least partly at fault for the heavy winter defeats to Manchester City (6-0) and Liverpool (5-0) that would ultimately cost Villas Boas his job.

It comes as little surprise then that Villas Boas's replacement Tim Sherwood has adopted a deeper defensive line to keep the opposition from getting in behind his back four, a strategy he stuck with in Saturday's FA Cup tie with Arsenal. Spurs captain and center back Michael Dawson is particularly ill-suited to play a high line and with Theo Walcott employed as the striker for the Gunners, a deeper line meant fewer opportunities for Arsenal's pacey England international to get on the end of through balls and run at Hugo Lloris 1 v 1.

While the deeper positioning may have mitigated the danger behind Spurs back four, it left far too much space between the midfield and defensive lines for Arsenal to exploit. These large gaps between defense and midfield could have been at least partly remedied while still sticking with a deep defensive line in one of two ways: Sherwood could have opted away from the 4-4-2 he's gone with since taking over and pulled a striker in place of a third center midfielder or, having decided to use a 4-4-2, he could have gone with a positionally disciplined, physical holding midfielder. With Sandro unavailable the obvious choice was Etienne Capoue.

As it turned out Sherwood went with Nabil Bentaleb and Moussa Dembele. Both players shuttled high up the pitch when Spurs were in possession, leaving large gaps between themselves and their center backs. Without a third center midfielder to plug the space by sitting deeper in front of the back four, Arsenal were able to quickly transition on the break into the huge amounts of space behind Bentaleb and Dembele and run at center backs Dawson and Chiriches.

Whether you play a high line or a deep one it's crucial that your defensive shape is compact and you leave minimal space between the lines. If Spurs were going to play a deeper line, their central midfielders needed to play deeper as well. This is particularly important against a team like Arsenal who boast a wealth of players skilled at playing in pockets of space between the lines. In this contest Tomas Rosicky, playing the #10 role, and Santi Cazorla and Serge Gnabry, tucking inside from the channels, were all able to collect the ball in space behind the Tottenham midfielders.

The two screen shots below show the buildup to Cazorla's opener. The first image shows the gap between Bentaleb, Spurs deeper center midfielder, and the center backs just prior to Bacary Sagna's simple penetrating ball into Gnabry in space between the lines (the ball is at Sagna's feet in the image who is hidden behind the Macclesfield v. Sheffield Wednesday score). Keep in mind Arsenal are not quickly countering here with Spurs racing to get back- they've had the ball for 8 seconds at this point, giving Bentaleb and Dembele time to get closer to their center backs.


This next image shows Gnabry receiving Sagna's pass. Gnabry is able to comfortably receive the ball in the vast space between Tottenham's defense and midfield while Bentaleb is completely taken out of the play with the Sagna's pass. Gnabry sprints inside forcing both Chiriches and Dawson to step and lays a pass wide to the left for Cazorla to finish. Had Spurs been more compact with a holding midfielder in front of the center backs, that holding midfielder could have stepped to Gnabry, allowing Dawson to check Cazorla's run inside.


The opening goal wasn't an isolated incident of Spurs leaving too much space in front of the back four. Prior to that Rosicky twice found himself in space behind the Spurs midfield and played penetrating passes into Walcott to set up dangerous opportunities. Chiriches made a last ditch block on the first one and Lloris stood his ground well at the front post on the second but Tottenham's weakness was obvious (you can see both chances in the highlights below).


The screen shot below shows another example. The gap here between Chiriches-Dawson and Dembele-Bentaleb is startling. Both Wilshere and Rosicky are in dangerous positions to receive the ball between the lines and cause the center backs problems. On this occasion Wilshere took a poor first touch and conceded possession but the goal would come shortly after.


Playing 4-4-2 against Arsenal is always going to be a substantial risk. Arsene Wenger's side are quite good at tucking their wide attacking midfielders inside and overwhelming the opposition in central areas. With Arsenal playing a 4-2-3-1 in this game and Cazorla often coming inside from the left, Arsenal at times had a 4 v. 2 advantage in the middle of midfield. If 4-4-2 was likely to work for Spurs, Sherwood needed his side to defend in tight, compact banks of four with one of either Soldado or Adebayor dropping in to put pressure on Arsenal's double pivot midfielders Wilshere and Mikel Arteta. As it played out, it was often Dembele and Bentaleb pressing Arsenal's two deep midfielders high in midfield, leaving space behind for the likes of Rosicky, Cazorla and Gnabry.

Many had questioned Sherwood's tactical acumen when he was appointed Spurs manager for the season. The sound defeat Saturday and his denial afterwards that his side were overwhelmed in midfield, or that they were even using a 4-4-2, will do little to quell those opinions.